Permissions
Overview
Use resource permissions to control which groups can view, edit, or administer an individual resource. The Permissions by resource page provides one place to find resources from services such as TileServer, dashboards, reports, GeoVault, and QGIS publishing.
Access is group-based:
- View allows a group to open and use the resource.
- Edit allows a group to change the resource and includes the access needed to view it.
- Admin allows a group to administer the resource, including its access settings.
- Public visibility gives the protected Public group view access, including unauthenticated users.
- Restricted visibility removes Public group access. Only groups explicitly granted access can use the resource.
Public means unauthenticated access
A public resource is not limited to signed-in members of your organization. Select Restricted for internal, customer-specific, licensed, or sensitive content.
Before You Begin
- Sign in to an active AcuGIS Cloud account.
- Confirm that your account can administer permissions for the target resource.
- Identify the resource name and the service that provides it.
- Decide which existing groups require View, Edit, or Admin access.
- Review group membership before granting access; every member of a selected group receives that group's permission.
Follow least privilege
Grant the lowest access level that supports the group's work. Most consumers need View, content maintainers may need Edit, and only resource owners or designated administrators should receive Admin.
Find a Resource
1. Open Permissions
Open Administration, then select Permissions under Access.
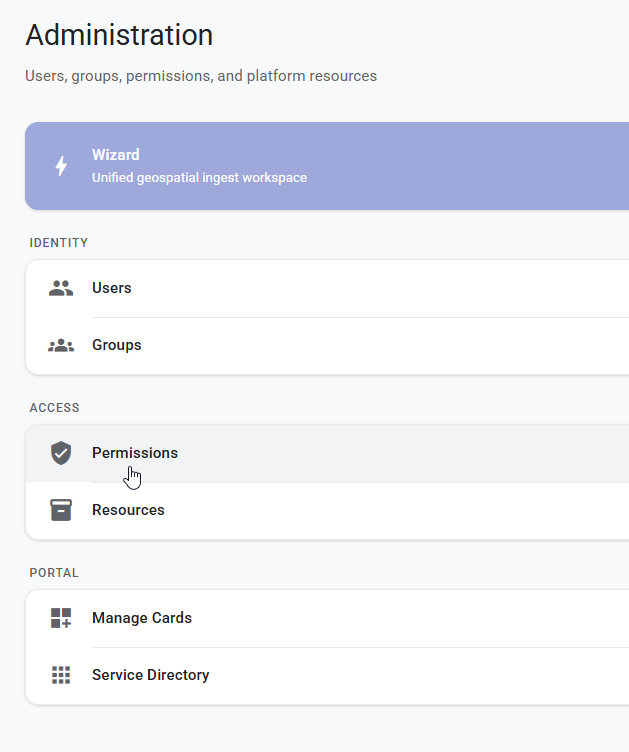
Caption: Open Permissions from the Administration area to manage access by resource.
2. Review the resource overview
The Permissions by resource page lists resources registered by connected platform services. Each row shows the resource type, source service, visibility, owner, groups with access, and available actions.
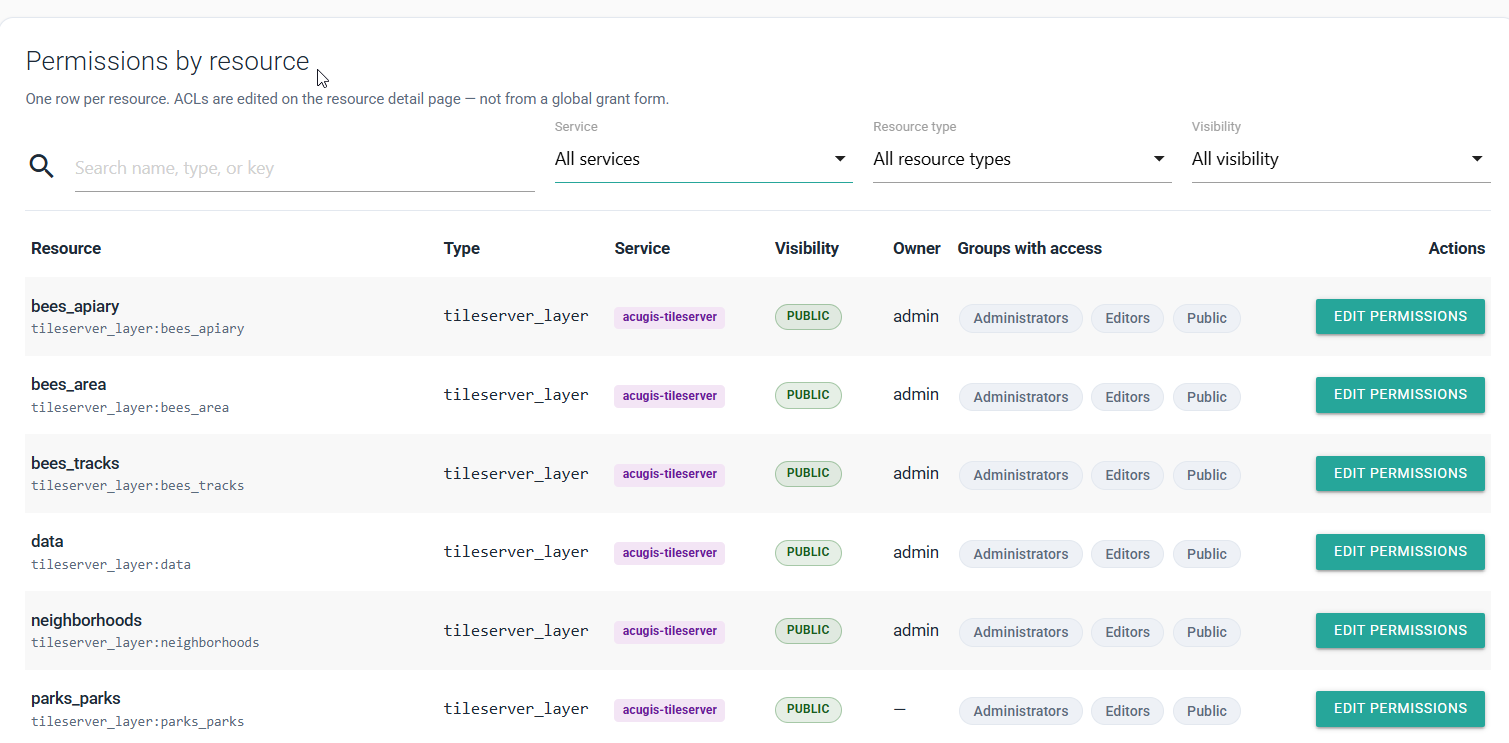
Caption: The overview summarizes the current visibility and group access for every registered resource.
Use the search field when you know the resource name. Use the three filters to narrow a larger list:
- Service identifies the platform service that provides the resource.
- Resource type limits results to a particular kind of item.
- Visibility shows public or restricted resources.
Similar names can identify different resources
Check the Type, Service, and Owner columns before editing. A map, dataset, or published project can have the same or a similar name in more than one service.
3. Filter by service
Open the Service filter and select the service that owns the resource. For a QGIS project, select qgis-publish-service.
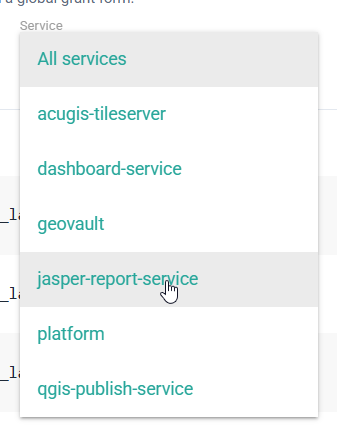
Caption: Filtering by the source service makes the intended resource easier to identify.
The list refreshes to show matching resources. Confirm the resource's name, type, visibility, owner, and current access groups.
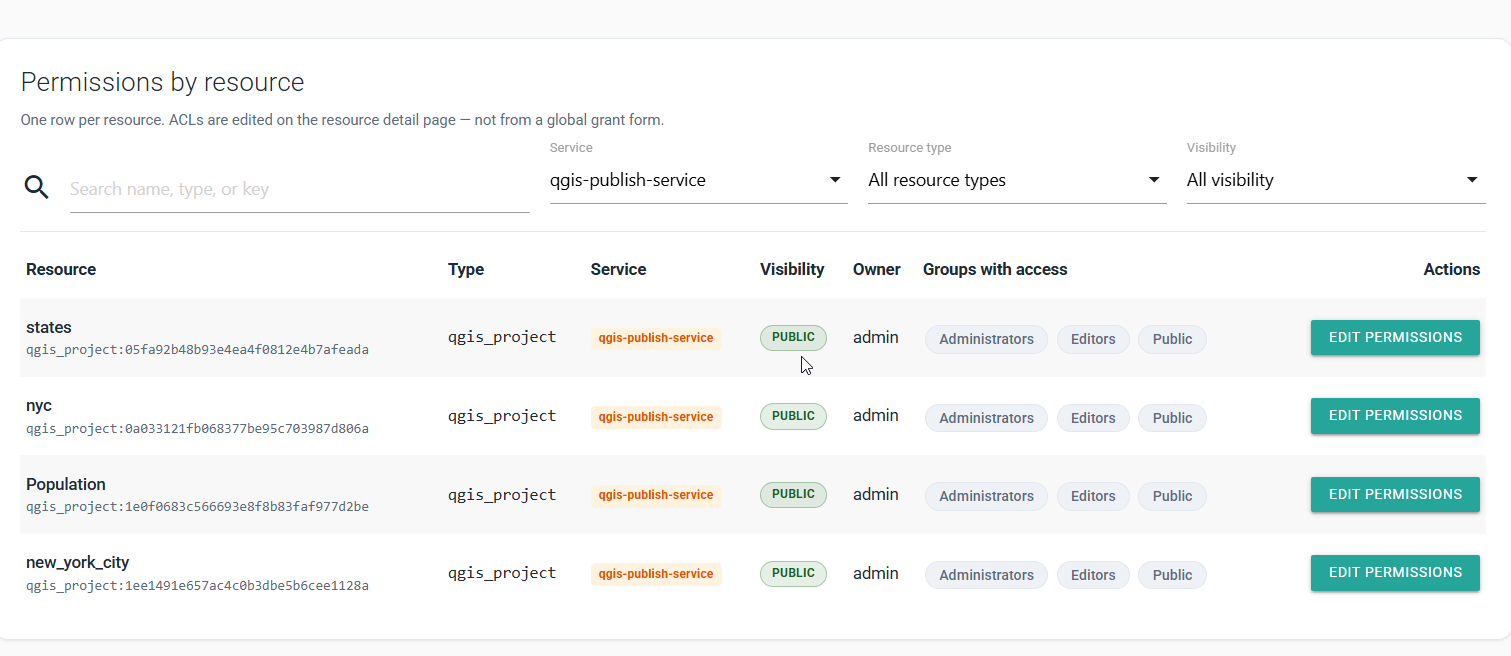
Caption: The filtered view shows the QGIS projects and their current Public, Administrators, and Editors access.
Combine search and filters
A service filter prevents edits to a similarly named resource from another service. Add a name search and resource-type filter when the service contains many items.
Configure Resource Access
1. Open the permission editor
Find the target resource and click Edit Permissions. Verify the resource name, type, and service at the top of the editor before making changes.
2. Choose the visibility
Set the resource to one of these visibility modes:
- Public — Public group can view when anyone should be able to view it.
- Restricted — no Public group access when access must be limited to selected groups.
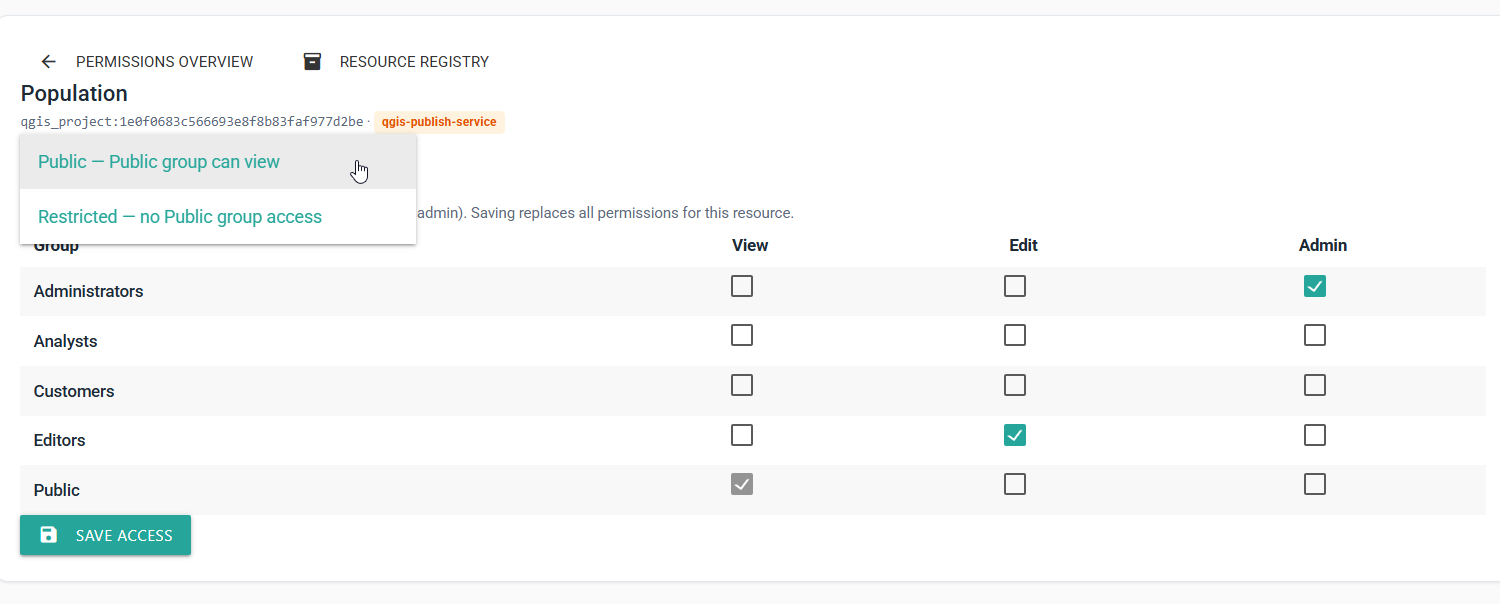
Caption: Set visibility first, then assign the appropriate View, Edit, or Admin level to each group.
When Public is selected, the Public group's View permission is controlled by visibility and may be locked in the matrix. Select Restricted to remove that access.
3. Assign group permissions
For each group that needs the resource, select its required access level:
- Grant View to groups that only consume the resource.
- Grant Edit to groups responsible for maintaining its content.
- Grant Admin only to groups responsible for the resource and its access.
- Leave groups without a business need unselected.
The selected level represents the group's effective resource role; you do not need to select lower levels separately.
Membership and permissions work together
A user receives group access only when the user belongs to that group and the group has permission to the resource. If a user belongs to multiple groups, the user's effective access can come from any of them.
4. Save and verify
Review the complete matrix, then click Save Access.
Saving replaces the resource's permission set
The saved matrix becomes the complete access configuration for this resource. Check every required group before saving so that you do not unintentionally remove existing access.
After saving:
- Return to Permissions Overview.
- Find the resource again.
- Confirm that Visibility and Groups with access show the intended result.
- When practical, test with an account from each affected group, especially after restricting a public resource or changing Admin access.
Common Permission Patterns
Public, read-only resource
Select Public visibility. Keep Public at View, grant Edit only to the group that maintains the content, and limit Admin to the responsible administrators.
Internal team resource
Select Restricted visibility. Grant View to the internal consumer group, Edit to the content-maintainer group, and Admin to a small owner or administrator group.
Customer-specific resource
Select Restricted visibility and grant View to the relevant customer group. Do not use the protected Public group for customer-only content.
Tips
Manage people through groups
Create groups for stable responsibilities, teams, or customers, then grant resource access to those groups. This is easier to audit than redesigning permissions whenever an individual joins or leaves.
Review broad access first
Before granting a new permission, check Public visibility and the user's other group memberships. An existing broad permission may already provide access.
Record high-impact changes
Note the resource, old setting, new setting, reason, and approver when changing Public visibility or Admin access. This makes accidental exposure or lockout easier to investigate.
Test the user experience
The overview confirms the saved configuration, but a test account confirms the practical result. Verify that viewers can open the resource and that they cannot edit or administer it.
Troubleshooting
The resource does not appear
Clear the search field and reset Service, Resource type, and Visibility to their All options. Confirm that the resource was successfully created or published and registered by the expected service. If it is still missing, ask an administrator to check the service and resource registry.
Edit Permissions is unavailable
Your account may be able to view the resource without administering it. Ask the resource owner or a platform administrator for the required Admin access. Do not grant yourself broader platform access solely to change one resource.
A user still cannot open the resource
Confirm that the account is enabled and belongs to a group listed under Groups with access. Check that the group has at least View and that the user is opening the same resource and service shown in the permissions overview. Ask the user to sign in again after a recent membership change.
A user can still access a restricted resource
Review all of the user's group memberships. Access may come from another group with View, Edit, or Admin. Also confirm that the saved resource is marked Restricted and that you changed the correct resource in the correct service.
Public access remains enabled
Reopen Edit Permissions, select Restricted — no Public group access, and click Save Access. Return to the overview and verify that the resource no longer shows Public visibility or the Public group.
A group is missing from the matrix
Confirm that the group exists and is available to your organization. Refresh the permissions page after a newly created group is saved. If it remains absent, ask an administrator to check the group and resource scope.
Required access disappeared after saving
Reopen the editor and restore the omitted group's permission, then save and verify. Because Save Access replaces the full permission set, every group that should retain access must be represented before saving.
The wrong resource was changed
Reopen that resource and restore its previous visibility and group matrix. Then locate the intended item by combining its name with Service and Resource type filters before editing.