Account Settings and Personal Access Tokens
Overview
The Account area contains settings for the signed-in user, including personal access tokens (PATs). A PAT authenticates command-line tools, continuous integration (CI) pipelines, and REST API clients without using your account password.
Treat a PAT like a password
Anyone who obtains a token can use the access it represents. Never place a token in documentation, source code, screenshots, chat, or an unprotected configuration file.
Before You Begin
- Sign in to the account that will own the token.
- Confirm that the account has only the permissions the integration requires.
- Choose a descriptive token name that identifies its purpose.
- Choose the shortest practical expiration date.
- Prepare a secure secret store, CI secret, or environment-variable manager before generating the token.
Tokens belong to the current account
A PAT acts with the owning user's available access. Changes to that user's status, group membership, or resource permissions can therefore affect the integration.
Open Account Settings
Click Account in the top navigation.

Caption: Account opens the settings and credentials for the signed-in user.
Open the Personal Access Tokens section. Existing tokens are identified by metadata rather than by their complete secret.
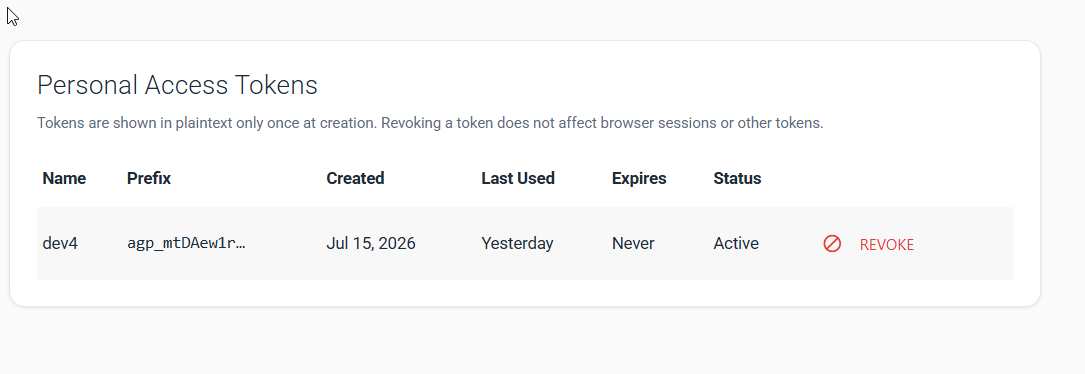
Caption: Review a token's name, visible prefix, creation date, last use, expiration, and status.
The token list provides:
- Name — the purpose label chosen when the token was created.
- Prefix — a partial identifier that helps distinguish tokens without exposing the secret.
- Created — when the token was generated.
- Last Used — the latest recorded use.
- Expires — the expiration date, or Never when no expiration was set.
- Status — whether the token is active.
Create a Personal Access Token
1. Open the Create token form
From Personal Access Tokens, select the option to create a token.
2. Name and expire the token
Enter a descriptive Name. Optionally select an Expiration date, then click Generate Token.
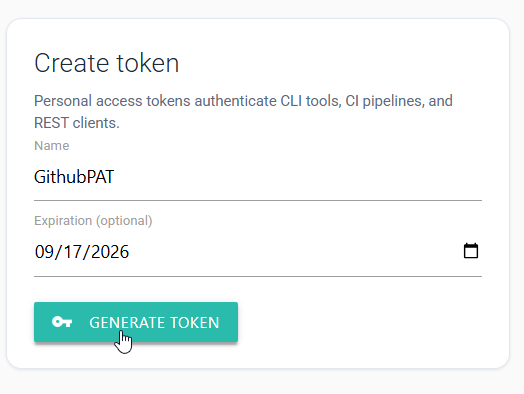
Caption: Name the integration and set an expiration date before generating its credential.
Use one token per integration
Names such as github-deploy, desktop-cli, or nightly-etl make a token easy to identify and revoke without disrupting unrelated clients.
Set an expiration
An expiration limits how long a leaked or forgotten token can be used. Record an owner and renewal date so the integration can be rotated before it stops working.
3. Copy the token immediately
The complete token is shown only once. Click Copy Token, store the value in the prepared secret store, and then click Dismiss.
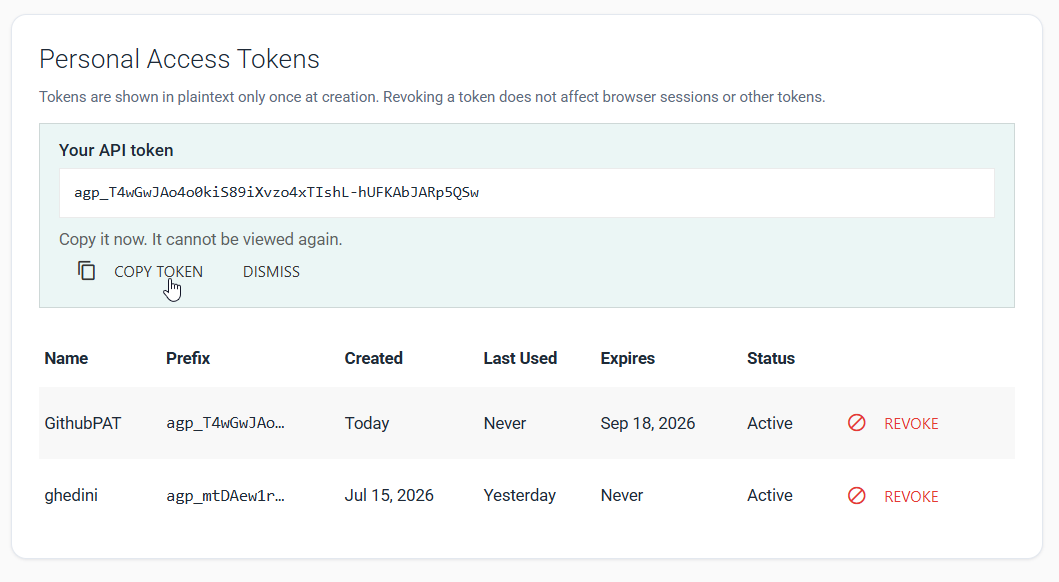
Caption: Copy and secure the token before dismissing the one-time display.
You cannot reveal the token again
If the token is not copied, or its stored value is lost, generate a replacement and revoke the old token. The prefix shown in the list is not a usable credential.
4. Configure and test the client
Add the token to the client using its documented credential or bearer-token setting. Prefer a secret manager or an environment variable rather than a command argument, because command arguments can be retained in shell history or process logs.
Test the smallest safe read operation supported by the client. Return to the token list and confirm that Last Used updates after the platform records the request.
Review and Revoke Tokens
Review the Personal Access Tokens list regularly. Investigate tokens that:
- Have unclear names or no known owner.
- Never expire.
- Have not been used for an extended period.
- Belong to a retired integration.
- May have appeared in logs, source control, or another insecure location.
To invalidate a token, click Revoke on its row and complete the confirmation. Revoking one token does not end browser sessions or revoke other tokens.
Revocation is immediate for the client
The integration will fail authentication after its token is revoked. Configure and test a replacement first when rotating a healthy production credential.
Rotate a Token
PAT values cannot be edited. To rotate one safely:
- Generate a new token with a clear name and suitable expiration.
- Copy it into the integration's secret store.
- Test the integration with the new token.
- Revoke the old token.
- Confirm that the integration continues to run.
If compromise is suspected, revoke the exposed token first, even if that temporarily interrupts the integration.
Troubleshooting
The token was dismissed before it was copied
The complete value cannot be displayed again. Generate a replacement token, store it securely, and revoke the unusable token entry.
The client reports unauthorized or forbidden
Confirm that the complete token was copied without extra spaces and that it is active and unexpired. Unauthorized usually indicates invalid authentication; Forbidden can mean the owning account or its groups lack permission for the requested resource.
A previously working integration stopped
Check the token's Status, Expires, and Last Used values. Also verify that the owning user is enabled and still belongs to the groups required by the integration.
Last Used does not update
Confirm that the client is using this token rather than another stored credential. Allow for a short reporting delay, run a safe request, and refresh the token list.
A token may have been exposed
Revoke it immediately, remove it from the exposed location, and generate a replacement. If it entered source control, removing it from the latest file is not sufficient—the token may remain in history, logs, forks, or caches.
The integration will outlive its owner
Do not depend indefinitely on a departing user's credential. Move the automation to an approved durable account or authentication method, then revoke the user's token as part of offboarding.